Frequently Asked Questions
RoofGoose Vent utilizes a proprietary design for its flat roof vents & low slope roof vents. As a result, we get frequently asked questions about what makes our roof-mounted exhaust and intake vents better than typical roof vents. Read the list of questions below to find out exactly what makes RoofGoose different than most flat roof vents.
All parts are manufactured in New England and assembled in Rhode Island.
Individually and in bulk “gaylord” boxes.
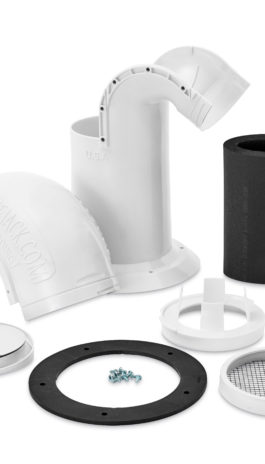
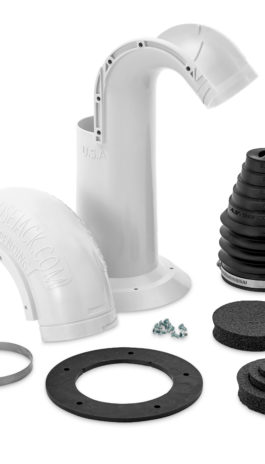
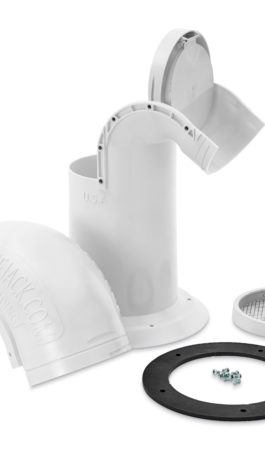
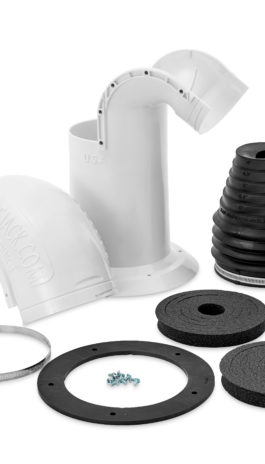
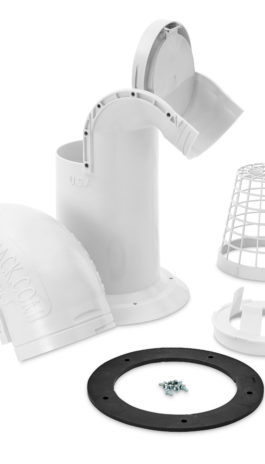
Individual packaging consists of a singular package that contains everything you need to install regardless of the model ordered. All packaging has convenient integral grab handles for easy transport onto the jobsite.
Bulk “Gaylord” boxes can be requested for 6″ quantities greater than (25) and 4″ quantities greater than (30). For greater quantities we can create “rough” and “finish” kits to minimize loss and damage. We find the bulk boxes minimize waste and expedite loading materials to the roof. You will find they are a tremendous labor savings when utilized and can be repurposed or 100% recycled. For Quantities greater then 25 units please contact Sales@roofgoosevent.com for Bulk Orders.
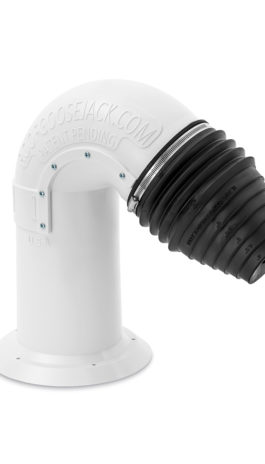
Most often our customers will use soft/malleable copper line sets to avoid the use of fittings as much as possible. All models can accommodate up to 7/8” line sets. Typically the RJ4-Utility is used for groupings of (4) condensers on a roof and the RJ6-Utility is used for groupings of (6) condensers on a roof. In both models depending on the size pipe being run and what other trades might be coming through the termination, you may find you can run more or less pipes than that.
You can also run rigid piping with a larger diameter than 7/8″, but it will require the use of fittings.
RJ4-IE With Screen and Damper adds 0.04 IN/WC
RJ4-DRYER uninsulated or INSULATED With Bird guard and Damper adds 0.000 IN/WC
RJ4-IE INSULATED With screen and Damper adds 0.012 IN/WC
RJ6-IE With Screen and Damper adds 0.06 IN/WC
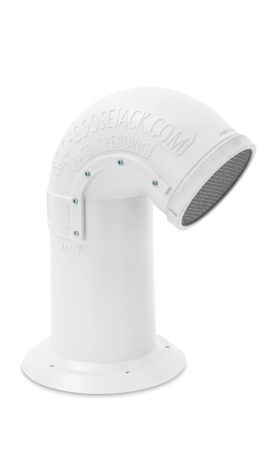
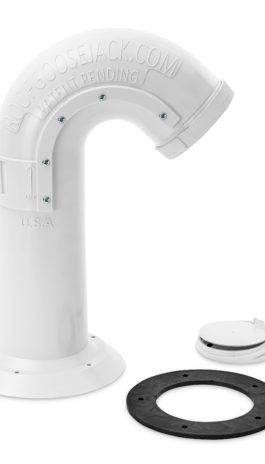
No, the gasket in the base of the termination is intended to only be a means of temporarily water proofing in most any weather condition without the need for caulk or any other sealants. We ship our vents with screws that have a red head so that they stand out and its easily identifiable when a termination needs to be flashed in.
Your roofer will determine your ideal method for flashing based on the underlying roof material. Depending on the sequence of construction, you can use either a split seam flashing or a standard one piece roof flashing.
There are two scenarios of installation for roof terminations.
Scenario 1 is a project where the RoofGooseJack Base is installed in sequence with the roofing membrane to allow for the roofer to flash to the provided base before running line sets through and stubbing duct up. Once the sleeve is flashed, later the mechanical contractor can install the RoofGooseJack Lid and necessary outlet cap once the termination is flashed accordingly. The Benefit to this sequence is that you won’t have exposed penetrations to the elements for long avoiding any concern for leaks. Even when flashed accordingly you will still have access to the vertical section of the base easily. The biggest draw backs to this sequence are it requires scheduling for both contractors to be in sync and working in the same area at once.
Scenario 2 is a project where the RoofGooseJack Base is installed out of sequence from the roofers requiring a split flashing. The benefits to this are that the mechanical contractor can push ahead with the work associated with they’re rough not being delayed waiting for penetrations to get flashed. It is best practice when following this sequence that the roof gets the penetrations flashed as soon as possible to avoid any concerns for leaks.
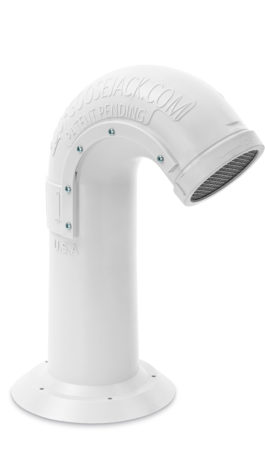
Not without having to reflash the penetration. The sequence of install would be as follows. Remove the existing vent hood or field assembled gooseneck and leave only the existing metal riser duct. Ensure the existing duct is long enough to protrude 1/2″ above the RoofGooseJack Base. If it is short extend the metal riser duct as necessary and if it is too long cut down to required height. We offer RoofGooseJack bases in one stocked length of 12” tall so be sure to double check your duct riser is the correct height.
The 2018 International Mechanical Code (IMC) section 504.4.1
Exhaust termination and outlet and passageway size.
States:
“The passageway of dryer exhaust duct terminals shall
be undiminished in size and shall provide an open area
of not less than 12.5 square inches (8065 Millimeter squared)”
The RJ4-IE has an unobstructed opening that is 3.75″ in diameter at the in-line damper which does not meet the code requirement.
With RoofGooseJack you have two (2) options:
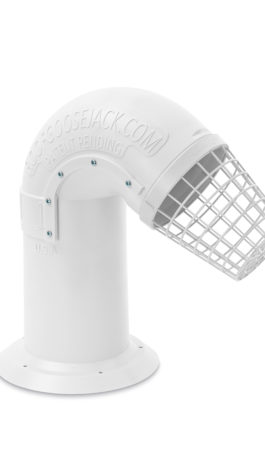
Option 1: Temporarily remove the Bug cap and reach into the outlet of the gooseneck. Remove the backdraft damper door and re-install the bug cap at the outlet of the gooseneck.
Option 2: remove all ten (10) screws from the side of the termination and remove the RoofGooseJack Lid. From there remove the entire eccentric damper collar and damper blade. Then reinstall the RoofGooseJack Lid and all fasteners.
After you complete one of these two options your RJ4-IE or RJ6-IE can be used for intake air.
Instructions are molded into the back of the RoofGooseJack Lid for reference.
Remove all ten (10) screws from the side of the termination and undue the bug cap/flexible line set jacket. Once the fasteners on the side of the termination are removed the lid slides off easily. Once inspection is performed reinstall all parts in reverse order.
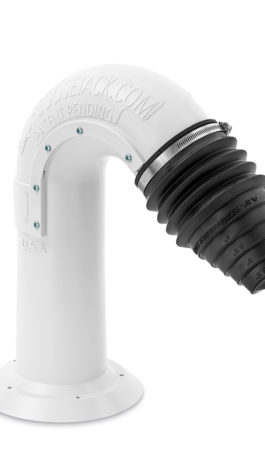
All flexible utility jackets are secured to the outlet of the termination with a Snap lock quick release hose clamp. After removal of the hose clamp you should be able to slide the cap off easily. If you need to take the cap off your line sets entirely you can split it back open, be sure to go easy and not tear the flexible locks. Once inspection is performed reinstall all parts in reverse order.
Instructions are molded on the side of the part/s
All Vent caps unscrew with a counter clockwise quarter turn and are reinstalled with a clockwise quarter turn motion.
The insulation provided has an insulation R-value of R-4.7 from the manufacturer and has been tested to ASTM E84.
You do not need any caulk or sealants to install our roof termination. At the base of every termination we have a gasket for temporary water proofing. When installed on a roof that has been cleaned of debris you will find there is no need for caulk. You can damage the gasket at the base if it is fastened down with debris underneath, take special care to clear debris as much as possible.
If you are concerned about water infiltration while waiting for the termination to be flashed in you can use a caulk to temporarily provide an additional seal.
Yes, you can. We find they are very useful for side wall vent terminations in order to lock in the exhaust duct from being pushed in by siders or other trades accidently. They are superior in this application because they are very strong and utilize clamping force to hold the duct in place rather than penetrative fasteners. They are available in 4″, 6″ and 8″ sizes.
No you can not. The international mechanical code (IMC) mandates that the duct be continues to the point of termination and you are not allowed to utilize plastic ducts above grade except in very limited applications.
Under each product there are details available in both .DWG and .PDF format for use in design documentation and installation guidance.
Refunds will be made to the original purchaser upon receipt of the items in undamaged, unopened packaging for a period of 60 days from receipt of order. Return shipping cost to be the responsibility of the purchaser and a 35% restocking fee will apply. View our REFUND POLICY.
